Here is where I started. I looked over the plan and thought, "sure, I can probably do all that stuff." It was mostly easy, though very labor and time intensive. Here's a little record of how it went with my 20/20 hindsight included, just in case you decide to build one, too.
 |
| I bought two extra bags... just in case |
Step 1: Go shopping. The list on the source web site is pretty comprehensive:
Necessary tools:
- cordless drill
- tape measure
- circular saw
- bucket (I assume this is needed for mixing the concrete. Also may be useful for sitting on.)
- safety stuff (dust mask, glasses, hearing protection, etc.)
- straight edge, at least 4' long
- pliers and wire cutters
- sawhorses/work surface that will fit a 4x8 sheet of foam
- utility knife, box cutter, etc. to open paper bags
- tapered trowel to pick up and smooth the concrete as you pour it
- scrap 2x4 on which to form the hardware cloth
- hammer/tools with which to form the hardware cloth over the scrap 2x4
- some way of mixing the concrete. I bought a large tub and used a garden tool to mix it. A real mixer will save your shoulders the weekend you choose to pour your fountain.
- a cup to measure each quart of water required for the concrete, and
- a container to hold all the water once measured (5 quarts per bag)
- flat, sturdy scraping tool (such as a multipurpose paint tool)
Required materials:
- one 4x8-ft sheet of 2" extruded polystyrene foam insulation
- four 80-lb bags of concrete mix (or five 60-lb bags)
- four 10-oz bottles of Quickrete Cement Color or equivalent (one bottle per bag, I chose the "buff" color and mine is the same color as that in the source site photos)
- 2-ft of 1/2" PVC pipe... or less. You only need enough to come through the top piece and attach your hose. See the section on assembly to read specific challenges with this.
- 2-ft of 10-gauge coated copper wire... or not. I couldn't find 10-gauge (used 12-gauge instead), and its use in this project is difficult to manage and of questionable necessity. Again, see section on assembly.
- 3" screws (I used coarse thread drywall screws)
- duct tape
- 20 minute setting-type joint compound (1 bag). I found nothing like this. I ended up using quick setting 'repair' concrete, and used most of a 55-lb bag.
- flower pot or bucket, at least 10" in diameter and 12" deep (a five gallon pail works great)
- 3" ABS toilet flange?
- hot glue/caulk?
- 9" or 10" play ball
- something with a 3" diameter to place on the ball to form a 'collar' at the bottom of the top piece. The source site wants you to use the empty duct tape roll, but I hadn't used it all yet. As it turns out, we had Bush's baked beans with dinner that night, and the can was exactly what I needed.
- 1x3 lumber, and screws to hold them together, to reinforce foam forms
- 1/2" galvanized hardware cloth
- river rocks/stones
and, last but not least,
- A PUMP. In my opinion, it's preferable to buy this before you begin. I bought a 425 gph and it's perfect, but I had to guess at which pump to get. I find it odd that nowhere on the source site does a pump appear as a required item.
- hose. Go to any big box store and there will be this black plastic tubing in the fountain/pond section. Don't buy this. It isn't flexible enough and it's overpriced. I got 1/2" clear tubing from the plumbing section. It was cheaper and I could buy as many feet as I wanted, not the whole roll of 15 feet or whatever. Thinking about it, I should have got the fiber-reinforced tubing used for faucet supply lines, as it won't kink or bend easily. I also bought...
- PVC fittings to make sure your hose will go on the end of your 1/2" PVC pipe. In my case, I bought a threaded adapter and a brass fitting that was threaded on one end and had a hose barb on the other.
Step 2: Cut and build the forms
 |
| My super awesome cutting diagram |
Cutting the forms was the easy part. Get your sharpies or dry erase markers and just take your time. I divided the foam up into large basic sections first (in red on the drawing), and then each of those was cut into individual pieces. I worried about my blade ruining the foam, or vice versa, but shouldn't have. Just have your shop vac handy for cleaning up all that pink powder. If you don't care to make your own cutting diagram, feel free to download mine (click the pic).
The only alteration I'd make to this cutting diagram is to ensure part B (that 4" square that creates an opening at the bottom of your column) is tall enough to fit your pump. If it isn't, make it fit, changing the vertical dimension (leave it 4" wide).
Once the pieces are cut out, it's a simple matter to assemble them all with (as described on the source site) 3" screws and duct tape. There are, however, some special precautions I should have taken along the way:
1.
Reinforce! goldengolfball, who left the comment on the source site, is right: you can use a mile of duct tape on this, and if you don't reinforce it somehow it
will bulge. It's about 1½ bags each for the column and the base; each bag weighs 80 pounds and needs 5 quarts of water (almost 10½ pounds). This is why I put the 1x3's on my materials list (though I didn't take goldengolfballs's advice and had to make 'adjustments' to my finished product...using a hammer). Specifically, reinforce (a) around the column form, and (b) the bottom of your base form (which ends up being the top of your base). With the column, it didn't matter much because I just got slightly curved lines instead of straight, but with the base, when those part G's start separating from part H, you get a jagged, irregular concrete lip projecting up around the edge of your project.
Also, don't forget to reinforce the bottom of the forms as they sit for filling. Heaven forbid you tilt your filled form to move it and the weight of the concrete rips the bottom away from the side. For only sliding around the garage floor, just duct taping it should work fine.
 |
Finished forms. I later added so much
duct tape to the column form it was
covered in silver. And it still bulged. |
2.
Level! When building the base form, pay particular attention to the height of your part G's. Make sure the top edges, as the form sits for pouring, are all even and level with each other. My edges weren't all aligned, and so I had to guess about what would be level. After I used my level to try and flatten it, I realized my garage floor is somewhat sloped, and my finished product shows it.
3.
Forming the top piece The source site has a brilliant plan for making the spherical top piece, but again goldengolfball points out an issue: you
must tamp this. A lot. Mix your form material too wet, as it will fill better and, later, break apart easier. Also, when first placing your play ball into the wet stuff, give it an inch or so beneath it. Mine sat pretty much right on the bottom of the bucket, and before I actually poured the cement, the very thin layer of filler cracked and had to be taken out, leaving a nice gaping hole which, again, had to be fixed with a hammer and a delicate touch. I also had some voids on the inside of my form, but decided to pour concrete anyway and see what happened. Fortunately, when I broke open the form a few days early to 'repair' before it cured too much, those 'fins' that filled in the voids broke off with the form. Something else: I recommend using a copper pipe. I tried spacing the end of my PVC from the bottom of the form and that was nearly a disaster. Copper is the right color, and even when it's oxidized, will probably look better than a thick white ring at the top of your sphere. Finally, think about a way to ensure the end of your pipe is in the exact center of the bottom of your form. Otherwise if the collar part isn't allowed to move a bit, you're stuck with the water shooting up and falling at the angle at which your pipe was sitting when you left it.
4.
Those copper wires The specified place for the wires on the inside of the column works out just fine, but when the source site tells you to put them into your part H, notice in the picture that the wires should be placed
inside that 4" square. I didn't see that and put mine right on the line, which is where the inside edge of your finished column will sit. Now is a good time to get your chosen pump and make sure it fits between these wires, because if it doesn't fit now, it sure won't when the base is finished.
5.
THINK about how you're going to get the form apart. For example, cutting a removable section from the bottom part F while assembling your base form will make it worlds easier to get both F's out.
Step 3: Mix and Pour
 |
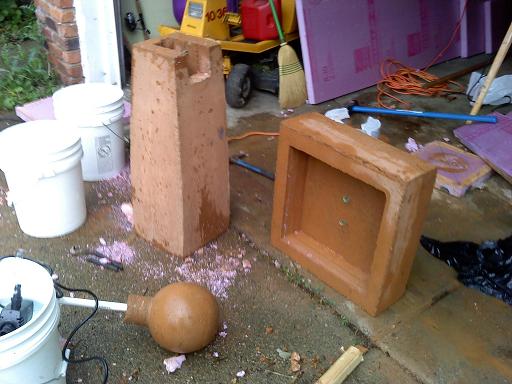
| Finished pieces, *finally* out of the forms |
This part was easy to figure out, but took most of an afternoon to do, and made me sore to boot. Mix two bags at a time, if you can. Pre-mix the color with your water before adding it, as this will help ensure the color gets evenly spread around. Also, I'm not a concrete expert, but I'm guessing it's best to just plan on the whole 5 quarts and add it in bulk, as opposed to eyeballing the consistency for each batch and potentially getting mixing differences from the top to the bottom of your fountain parts.
I used a triangular brick trowel to scoop up the concrete and fill my forms. It worked great, and thank God... I can't imagine trying to do that job with anything else. As you fill, TAMP the form, especially at first as you're filling those bottom edges and corners. I used the side of my hammer. I filled my base form first.
Smooth the top surface of your poured concrete any way you know how. The brick trowel is all I had so I made do. If you have a tool to do this job, super. It may or may not matter, depending on what kind of surface your base will sit on. Also, re-check your leveling on the base. NOW is the time to make corrections. Finally, if you think it might be cool to put your kids' hand prints (or a date, or your initials, or anything) in the concrete, do it here and now (/facepalm for not thinking of this myself in time).
When filling the column, I put a trowel-full of concrete down each side, then tamped it. I repeated these steps over and over again until I was a little less than 4" from the top. At this point, I put my part B into place. Remember, this is the piece that leaves the recess at the bottom of the column inside which the pump will sit. If you put this in place while assembling the form, you'll only have access to three open sides when filling, and there's no guarantee the space underneath it will be nice and uniform and pretty. So slide it in just before you're done filling the form, screw it in place, and finish filling. Making the concrete nice and flat at the open end of the column form is a relative no-brainer after you've done the base.
The suggestion to leave the forms intact for a week is a good one. I read one site on curing concrete that said to cover the exposed concrete and form in plastic to prevent evaporation. Although I waited a couple days, I eventually did this and my pieces are pretty solid.
Step 4: De-form and Assemble
 |
| The finished product... so far |
Removing the forms was probably the single most frustrating process. The source site says "you can reuse the outer form parts to cast several fountains." This is bull, because by the time you've managed to get all the form parts off, most of them are mangled more than a little, and some are broken beyond recognition. The foam inside the column is the worst. Have a flat scraping tool handy, as you'll be forcing this down the concrete surface to break off pieces of your part C's 4-6" at a time to remove this form completely. I later thought the 5-in-1 (or 7-in-1 or 14-in-1) paint tool I forgot I had would probably have been perfect. In any case, however you de-form your fountain pieces, it's a good idea to have a garbage bag/can and the shop vac handy. "Clean as you go" is definitely good advice during this process.
When removing the top spherical piece from its form, I overturned my five gallon pail until the form slipped out, then set it on the driveway and hit the corner with my 5-lb sledge. I was fearful of the inside piece, but after twenty minutes of trying everything else I could think of, this was my last option. After a few well-placed, not-too-hard blows, the form split nice and easy with the sphere perfectly intact.
Once out of the forms, inspect the pieces. Knock off any protrusions you don't want, straighten those green wire loops, etc. Then drag everything to your chosen location. Plan to be able to plug in your pump somewhere nearby.
Level the base at the top so that when it's filled with water, the water's surface is equidistant from the top edge of the base. Lay the column with the bottom end inside the (empty) base and carefully lift in a way that will leave your copper wire loops safely inside the bottom cavity of your column. This may require a friend to either lift or guide the bottom into place. If you're using the copper wire to secure those loops together, cut your wire and get to securing now. You will be scraping your knuckles, so have some bandaids handy. Also, recheck how your pump fits into the cavity after you're done.
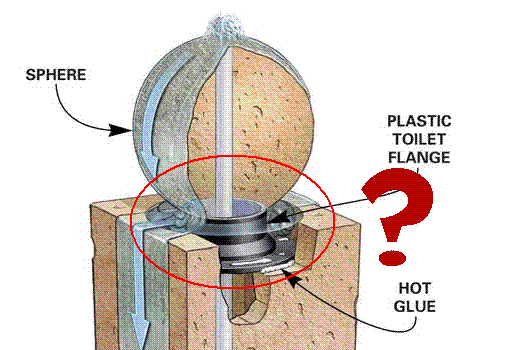
 |
| Say what?? |
Putting the top piece into place is tricky business. I have no idea how a 3" toilet flange is supposed to fit into the 8" circular hole part D is intended to make. I'm convinced I either misunderstood the directions or bought the wrong thing, and the source site has absolutely no description on assembling this part. It's something I'm still working out a solution for. Everyone says my fountain looks fine the way it is, et cetera et cetera, but I won't be done until I find a way to support that sphere, seal around the edge, and fill the space with pretty black rocks. For now, it's there, but looks sunken. Maybe I'll update later.
In any case, when placing the top, I recommend instead of leaving your pipe at its original 24" length and cutting hose to reach your pump, that you cut the pipe and make your hose longer. This is because you'll have to hold the sphere in one hand while fishing the pipe/hose down the center of the column, somehow figuring out how to slide it over the hose barb on the pump (another process best suited for having a partner). In my opinion, it'd be easier to place the pump, fish the hose up, then attach it to the pipe, holding the two as close as possible. Any kinks or sharp bends in your hose will render your pump ineffective, so a little more slack might be a good thing.
Final Thoughts
I filled my base with water and plugged in my pump, set the top so the water went straight up, and proceeded to enjoy it as-is. I still intend to figure out that top piece; as it stands, more water falls down the center of the column than goes over the sides, and it makes an echo-ey/drippy sound, as opposed to the Zen/tinkly sound I'm after. I may or may not form my hardware cloth into the cage for the bottom. Most likely is I'll form it and cover it with rocks, and then decide whether or not to leave it there depending on how I like the way it sounds.
Considering the fact that running the pump dry can ruin it, it's not a bad thing to be able to see how much water you have in there. Depending on ambient conditions, I lose as much as an inch per 1-2 hours of running due to splashes and evaporation.
My pump is sitting on its side just outside the 4" square hole it's intended to sit into. That's something else I'll be working on. It's intriguing how the pump itself doesn't need to be in the water at all, seeing as how I can attach a fitting (and therefore a hose) to the inlet and pump out my water for recirculation. Maybe, in the next fountain, I'll put this fact to good use.